So with my vanity project, I have been running into every issue that could come up. With the heat and humidity, it made all of the veneer on it bubble and crack throughout the piece. So I needed to remove it. I have come up with some steps on removing the veneer.
1. Pull off/ peel off any veneer with your hands.
If there is any part of the veneer that seems like it would be easy to peel off, try to do it since it will peel off in large chunks. I suggest that you where gloves when removing the veneer, so that you don't get any splinters
2. Use a metal scrapper or putty knife to loosen up pieces to peel.
Only use the corner of it to get underneath the veneer and not straight on. If you go straight on, you will more likely gouge the wood underneath.
3. If the veneer is still stubborn, use a hair dryer on high when the scraper is underneath the veneer.
You want to blow the hair dryer underneath the veneer, so that the glue will loosen and will make it easier to scrape up the veneer and possibly pull up.
4. Use a wet towel, if there is any hard/ stuck on pieces.
Use an old towel and wet it with hot water and let it sit for about 20 minutes and they should just come up.
5. Blow Dry the glue and scrape up.
I have been told to use an iron to heat the glue, but I don't trust it and used the blow dryer. It still works, but takes a little bit longer. You want to keep the heat in a small area and scrape up the glue.
I hope my tips help you remove the old veneer on any of your pieces.
Monday, July 27, 2015
Thursday, July 16, 2015
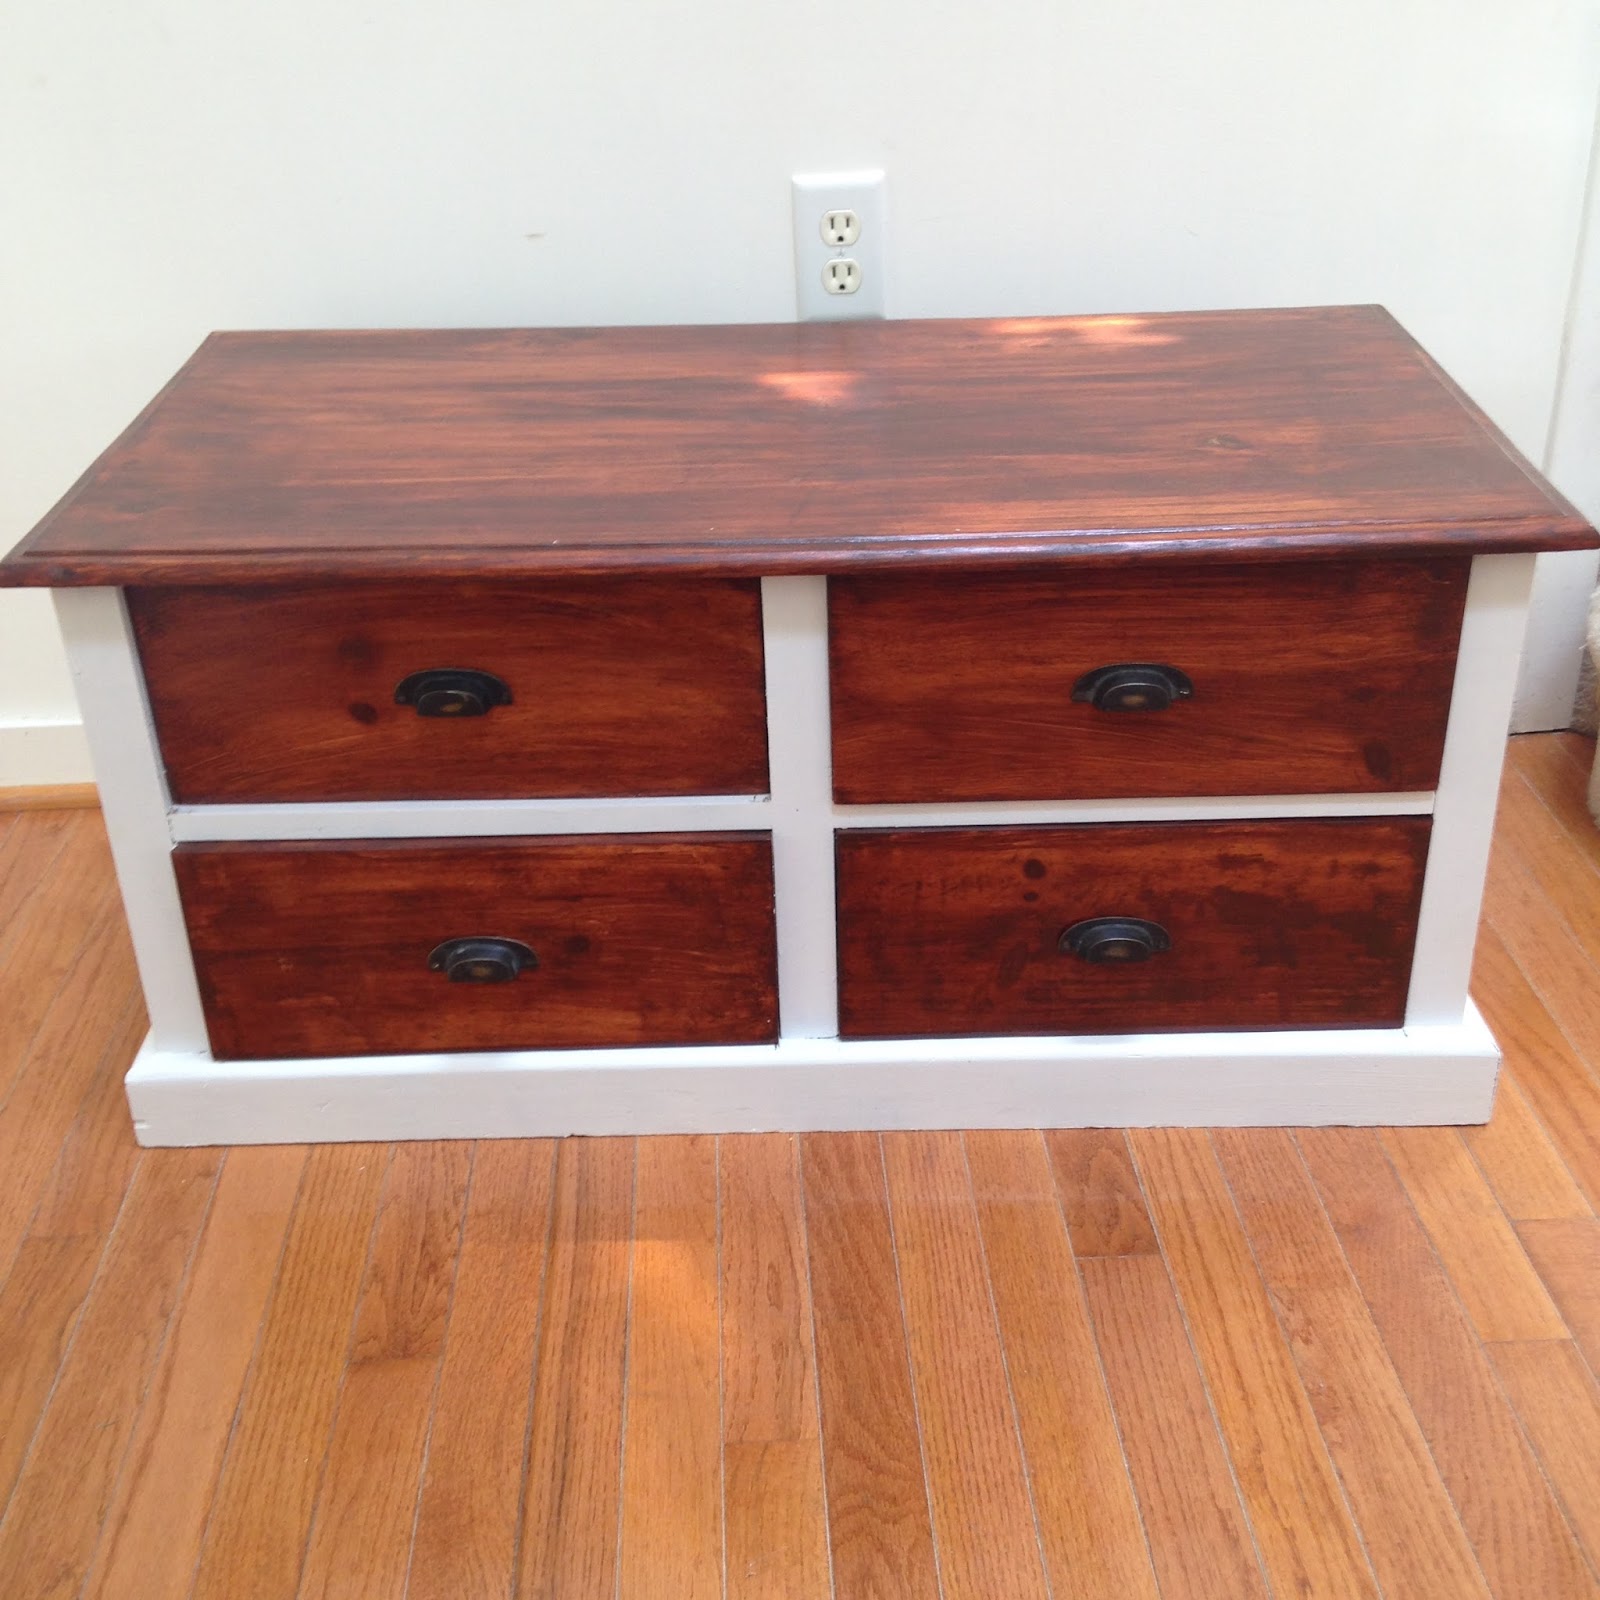
Four Drawer Coffee Table
So yet again I forgot to take pictures before I started working on this project. I know I get caught up in the moment of working on a new project. I found this piece at a local flea market for only fifteen dollars. But when I found this table it was a dark brown, almost black, with a lot of gouges all over the top of it. Now it is beautiful as ever and has been given a new life.
I love, love, love the original hardware that came with the coffee table so much that I kept them and reused them on this piece. The one thing you can't tell in these pictures is that the drawers go both ways on the table so you put items in them on either side.
 |
| Walnut stain with Behr's White paint |
I love, love, love the original hardware that came with the coffee table so much that I kept them and reused them on this piece. The one thing you can't tell in these pictures is that the drawers go both ways on the table so you put items in them on either side.
 |
| Up close of one of the drawer's handle |
 |
| Side view of the coffee table |
 |
| Handle on the side |
I love the finished product so much that I will be using this once I have a place of my own. I can't wait to share more about the vanity project, once I have more work completed on it.
Thursday, July 9, 2015
My first sale
So I finally feel like I accomplished something with Refurbishing From The Heart. I was able to sell the teal and white nesting tables on the 7th.


If you live in the Greater D.C. or Baltimore area and are interested in a piece I have completed email me at refurbishingfromtheheart@gmail.com.
Monday, July 6, 2015
Children's Toy Chest
So my most recent project I completed was a children's toy chest. It started in pretty rough shape, but had a great structure to it. I was a little silly and wanted to start working on the project right when I got it, so I forgot to take before pictures.
I wanted this to be more unisex so I knew I needed to purchase a different color so that anyone could enjoy it.
I'm really happy with the end result of this piece. I will post more pictures and have more tips for refurbishing furniture soon!
I wanted this to be more unisex so I knew I needed to purchase a different color so that anyone could enjoy it.
 |
| Behr's Tanzanite |
 |
| Maple Stained Top |
 |
| Inside pained white |
Wednesday, July 1, 2015
Top 5 tips for painting furniture with latex based paint
If you have ever looked at using chalk paint or milk paint for painting furniture, then you know how expensive it can be just to buy a quart of paint. I prefer to use latex based paint to save a little bit of money.
Top 5 Tips For Painting Furniture With Latex Based Paint
1. Use only the best quality supplies for any job.
In order to start off right, you need to make a small investment in purchasing the right supplies. It will make your projects a lot easier to achieve the look you are going for.
Prep Supplies:
The first thing you will need is a wood filler for any nicks in your piece and I suggest any Elmer's brand of wood filler. You also need painters tape and the go to is Scotch Blue Painters Tape. They come in multiple widths and now even make one that works on wet paint. The other supplies I suggest are in my The Top Five Tools I Use For Refurbishing Furniture.
Painting Supplies:
I think the best brand for brushes and rollers is Purdy. You can buy any range of size and they even sell a pack of three brushes. When it comes to paint you don't want to scrimp on the quality as well, so you would want to get a paint and primer color. I personally buy Behr at Home Depot. Even when you find the right paint you need to paint at least two layers to get an even coverage. The last thing you would need is a sealant that is water based like Minwax Polycrylic.
2. Take your time prepping your furniture.
You don't want to ruin your project or restart your project when you are in a hurry to finish a piece. The first thing I do with any piece of furniture I get is I wash the piece with PineSol. This helps get any dirt or sticky substances off of it before I do anything else. The next thing you want to do is remove any hardware and drawers from your piece, while keeping it organized so that you know where the hardware belongs. Then you want to sand your piece until it is nice and smooth. I suggest to use an 80 grit, then 120 grit and lastly 220 grit. The last thing is to clean off the dust with either a wet cloth or tack cloth.
3. Don't scrimp on the paint and have fun painting.
Once your piece is fully sanded, you are ready to paint. I suggest painting a light coat for the first coat, and then use more paint each time you add another layer. In between each coat wait at least an hour. It might take over a day of painting to get the right color you want to achieve. Depending on your work space, you may want to take a part of your piece outside to see how the color looks in a different lighting.
4. Store your wet brushes in a ziplock bag.
When you are waiting for your coat of paint to dry, you want to ziplock your brush so it won't dry out before you are ready for another coat. This will keep your brush nice and fresh in between the coats.
5. Seal your latex paint with a water based polycrylic protective finish.
The last thing you want to do is to seal your paint. Using a sealant that is water based will protect your piece of furniture from chipping any of the paint off. At least one coat will do the trick, if you are worried about missing spots, you will need to lightly sand it and paint it a second time after 24 hours of your first coat.
I hope you enjoyed my tips for painting furniture with latex based paint. If you have any questions or any tips you have please comment below.
Subscribe to:
Comments (Atom)